Project Fast Hamster

Phase I - Construction
|
Project Fast Hamster |
|
|
|
Phase I - Construction |
So, to sum up:
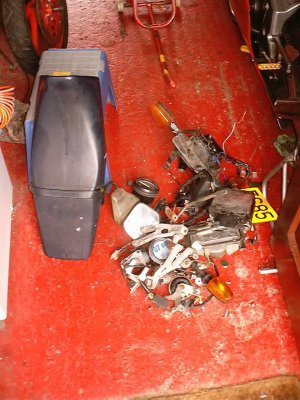
Yes, one hundred pounds. Now, for that I'd expect a box of bits, rather than anything immediately recognisable as once the finest 250 road bike on the planet. When I first saw the bike my immediate thought was "hmmm, looks like it's been crashed through a hedge and left in a field for a couple of months" and this turned out to be exactly true. It was stolen, joy-ridden, crashed, left in a field, and recovered. I only hope that the twat that stole it broke both legs in the crash. Anyway, I digress - the bodywork was largely missing, but that's not an issue as I'm sure I can scrounge some more on the way. First priority was to check the state of the motor, so I decided to kick it over to see just how badly seized it was. It started first kick, and ticked over perfectly.
So, part one begins in earnest...
23-Jul-2002
First job is to strip the chassis, and throw away the bits I don't need any more. After a couple of hours in the garage that pile of bits has grown to:
I may also weigh this lot that I've taken off, just to see how much weight I'm saving. Seeing as I can't afford to go bananas in the search for horsepower, I'll need to keep this as light as possible. This will need to be done through imaginative engineering and brutal use of my lathe/milling machine rather than any use of fancy materials.
The shopping list so far:
Cost so far:
Bike: �0
24-Jul-2002
The stripdown continued apace, and has so far revealed very little in the way of absolute horrors... The wiring has been butchered at some point, but seeing as I'll probably be stripping the loom down to the bare minimum at some point this is largely academic anyway. Both powervalve cables are seized solid, but seeing as the powervalve linkage had fallen off this is hardly surprising. I have no idea if the previous owner of the bike ever noticed that it had the performance of a slug on mogadon. The head came off to reveal two very coked up pistons, and a quite breathtaking amount of crap accumulated on the right hand powervalve. It's going to take a lot of cleaning up, but it all looks mechanically good. One of the barrels has been taken out to .5mm oversize at some point, and there are signs of scuffing in both barrels. Nothing major though. If this were a money no object rebuild I'd get them both bored to 2mm oversize, and fit new pistons and rings. As it is, I'm in a bit of a dilemma... It does really need new pistons, so do I get it rebored for an extra fifty quid at the same time? Decisions decisions... Nope. This is being done to the absolute minimum cost, so I'll just tidy up what's there, and fit new pistons to match the barrels.
The shopping list so far:
25-Jul-2002
More stuff taken off, more stuff on the shopping list... The coolant expansion tank and CDI unit mounting bracket got added to the (rather impressive) pile of superfluous bits. I reckon I can use the brake pads that are in there already - they're EBC green, and while not being the best pads in the world, they have the benefit of being cheap. Looks like I may have also scrounged some bodywork, so that keeps the cost down.
The shopping list so far:
More bits taken off...
29-Jul-2002
Finally got around to dropping the motor out of the frame, and having a
good look around it. First plan was to split the crankcases to take a
peek in the gearbox and at the crank. However, 3 pints of Carlsberg Export
aren't the ideal preparation for this particular activity, so I made do
with whipping off the clutch cover and having a good look at the oil
strainer and clutch. Nothing amiss at all there. In fact, the clutch
looked almost new. Even the clutch cover gasket was in remarkably
good shape. I'm half tempted just to bolt it all back together, as it
really doesn't look (or feel) like it needs a stripdown at the moment.
Besides, I haven't got my workshop manual back yet, which will make the
whole process a lot easier.
All is not so rosy at the top end though... The powervalves are pretty
knackered. They will need new seals on both sides, and new bushes. The
bushes I'll turn up myself out of a spare lump of aluminium that I'm
sure I can find on the floor of a local workshop somewhere... The seals
will, sadly, need to be paid for.
And so onto the suspension... The front end needs new fork seals, and an upgrading to something like 12.5 weight fork oil. That should sort out the boingy front end. The rear shock... I remember TZRs never did have very much in the way of effective damping at the back, but I don't really remember it being as bad as this one. I'm hoping it's just with the engine out of the frame, there's not enough weight on it to get the damping to work properly. It's pointless worrying about anyway, as I don't have enough money for a new shock, and as far as I know, they're not rebuildable. Besides, the point of this exercise is to get this done cheaply in the initial stage, so I'll just shut up and ride the thing.
And finally, the bodywork... The top cowling looks OK, and I reckon the hand blisters can be reclaimed with a bit of imaginative use of glass fibre. However, the screen has at some point been cleaned with a combination of Hydrofluoric acid and chilled iron grit. Sadly, while this has undoubtedly removed the dead flies, it has also rendered it entirely opaque. It's not so much a screen any more as a shield. It's not salvageable, so that's another 30 quid on the shopping list, dammit. It looks like the bikes original body panels have been found, so that should save me a few quid with any luck. Alternatively, if they are in good condition I may well sell all the road going bodywork and buy a race fairing with the money. We'll see... I've got a spare TZ seat unit that will be pressed into service, so that's going to save a few quid.
The shopping list so far:
More bits taken off...
30-Jul-2002
The great powervalve farce continues... Were I not on such a tight budget I would simply have thrown the whole lot in the bin and ordered some new ones by now. And were I not so painfully aware of how crucial they are to the performance of any two-stroke I would have just bodged them back together and hoped for the best. As it is, as well as having to machine new bushes and buy new seals, I'll also need to get the valves themselves welded and machined. The dreadful little comedy linkage that holds the two valves together has worked loose at some point in the past, and rattled around so much that the two valves now sit out of alignment with each other and cannot be tightened up correctly. The really annoying thing about this is that all it would have taken is 30 seconds with a small spanner every 6 months to keep that linkage tight, and this would never have happened, and the bike would have been much better for it.
I find it hard to believe that someone as cretinous as one of the previous owners could ever even read the test application form, let alone get a license to be let loose on the road.
Other than that, the main item of note today is the renovation of the reed blocks. Nothing untoward there - just needed a bit of a clean up and will need new gaskets come reassembly time. They will, at some point in the future be removed again to allow for tuning. However, that's not part of the plan for phase one of this project.
The shopping list so far:
More bits taken off...
31-Jul-2002
It may have come to several peoples attention that I'm not really much of a
mechanic - as it turns out I'm not much of a chemist either... I'd asked a
few people for advice on decoking the powervalves, as they were pretty
thickly coated in the stuff, and a wire brush just wasn't touching it. A
couple of people suggested a strong solution of Sodium Hydroxide (caustic
soda), so I went out and got some today, and mixed up a nice strong
solution. I was ever so careful in doing this, mainly due to the dire warnings
on the back of the label. I even went as far as wearing rubber gloves, something
I don't normally admit to doing in public. Anyway, the time came to put the
valves in the solution. It was at about this time I noticed that the
pot I'd mixed it up in was getting very warm, and fumes were starting to
eminate from it. "Blimey" I though "it must be cutting through the carbon a
bit quicker than I thought". At this point I was still thinking pretty
clearly, so I grabbed a pair of mole grips to get the valves out, as I
remembered how hot the solution had got. The first thing to hit me was a
big lungful of something very, very nasty indeed. Gawd knows what those
fumes were, but it made me drop the valve back into the solution, and scuttle
out of the garage for a few breaths of fresh air. From where I was I could
still hear the caustic soda fizzing away... I held my breath, and dived
back into the garage and pulled the valves out of the pot. Completely
forgetting how hot they were I tried to pick them up, dropped them, and
took a sharp intake of breath as I burned my fingers. About 5 minutes later
I was still laying on the lawn hacking my lungs up when my neighbour of 1 week
peeked over the fence...
"You OK?"
"Yup - just fixing my bike"
He looked at me, didn't say a word, and shuffled off, wondering what kind
of idiot he'd just moved next door to. Anyway, I ventured back into the garage
and picked up the valves, which had by now cooled down a bit. They were coated
in a thick grey sludge, which I took to be a good sign, as I assumed it was
the remains of the carbon. So, I washed them carefully in soapy water, and
noted that the carbon was largely unscathed, and all that fizzing and heat
was actually the aluminium of the valve itself dissolving.
Bollocks. I suppose looking on the bright side I may have saved a bit of weight.
So, to console myself, I cleaned the carbs up. And, in a somewhat miraculous turnaround of events they came apart, cleaned up, and went back together with no drama at all.
Don't suppose anyone out there has got a half decent pair of TZR250 powervalves they want to get rid of cheaply? mail me if you have, and I'll love you forever.
05-Aug-2002
Nothing too exciting to report over the last few days, due to a complete lack
of activity on my part. I've chopped off the baffles internally, and cleaned
up what remains as best as possible. The powervalves were eventually cleaned
up using my lathe, as everything else I tried just wasn't doing the trick. They
don't look too bad now, but well see how it all goes back together. I've also
chopped the ends off the footpegs, as they are about 6 inches too long.
I'm starting to get to the stage now where I'm going to have to start spending
money to get things back together again. Or I may just split the crankcases
and have a good delve around and clean out of the gearbox and crank. That
said, I'll still need to spend money on a clutch holder and flywheel puller
if I'm going to do that anyway.
Decisions, decisions. I may just lock the garage door for a week and not do anything at all. This isn't down to a lack of enthusiasm on my part. If I could, I'd go down to my local bike shop with the shopping list, and buy all the parts tomorrow ready for the rebuild. Sadly I can't, so I won't.
06-Aug-2002
Well, seeing as the time has come to start spending money, my first call was
to Graham File, on the grounds that if I'm going to spend money on a two
stroke motor, there's nobody better to give it to. The conversation went
something like this:
"Hello Graham, I'm racing a TZR next year on a very tight budget, and need
the heads and barrels looking at. Can you help?"
"Yes, bring down the crankcases at the same time, and we'll do a bit of work
there too. Oh, and don't forget the crank, and we can check that. Oh, and
bring the powervalves and I'll re-machine them."
"Cool. I'll be down next week"
So much for the budget rebuild...
So, seeing as I'll be taking a pile of bits along to Graham to be worked on, I thought it would be a good time to split the crankcases and get everything neat and tidy. Everything was going very well until I got to the clutch basket. Remember what I said yesterday about needing a clutch holder? I decided that I didn't really need one, and that a pair of tyre levers and an old 22mm ring spanner would do the trick nicely.
The shopping list so far:
More bits taken off...
Another graphic demonstration of my mechanical prowess... How to turn a clutch basket into a paperweight.
At this stage, I think it's valid to say bollocks again. In fact, I may rename the whole sorry affair "project bollocks"
07-Aug-2002
Well, I finally managed to get the clutch basket and rotor off by the simple process of taking the whole lot down to Cambridge Motorcycles where they not only have the proper tools, but also have more mechanical knowledge than yours truly is ever likely to have. I was so chuffed with this that I ordered the first pile of bits for the rebuild.
So, all that was left for me to do was remove the stator and ignition pickup. Easy, eh? Well, it would be if Yamaha didn't make the screws out of a comedy alloy of Stilton cheese and old sardine can. And, to add insult to injury, they then use a threadlock you could use to glue the engine to a large airliner with. I don't suppose Mr. Yamaha will ever read this, but please, can you use proper steel allen headed bolts in future for this kind of thing please? I've already replaced the float bowl screws with steel allen bolts for exactly the same reason.
08-Aug-2002
Back down to the splended chaps at Cambridge Motorcycles to see about getting the stator off. The good news (well, not actually good, but it made me feel slightly better) is that they couldn't manage it either, due to the abysmal quality of the screws used. Looks like the only way we can get the stator off is to spot weld handles to the screws (yes, really).
The even better news is that the pile of bits I ordered yesterday have already turned up. I'm like a kid at Christmas time when it comes to opening padded envelopes with new bits in.
Cost so far:
Plugs, plug caps, reed block gaskets, water pump gasket, fork seals,
fork oil, powervalve seals: �
It's also worth noting that within 5 minutes of ripping the package open I'd lost one of the powervalve seals. Luckily I ordered a spare one...
And, even more good news... So far the list of parts blagged from other TZR riders includes a fairing, clutch basket and pair of forks. This should a) keep the cost down a bit and b) lead to a good hangover or two.
Flushed with success, I started looking at the wiring loom - there's a lot of excess crap in there, so I'll be stripping out all the non-essential wires and leaving behind just those necessary for generating sparks and operating the powervalves. I'm still unsure about the charging circuit... I'll get it on a dyno with the circuit connected and disconnected and see if there's any measurable difference.
More bits taken off...
13-Aug-2002
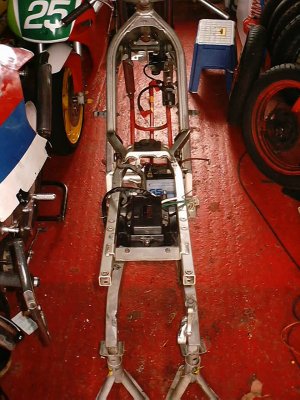
Finally finished stripping the chassis down to it's component parts, with only the bare minimum of stress... Firstly, the regulator/rectifier put up a bit of a fight. The famous Yamaha comedy alloy screws had welded themselves to the subframe so tightly that I actually broke my screwdriver (not a cheap & nasty one either) attempting to get one of them out. In the end it took a club hammer (the trusty rubber mallet wasn't up to the job) a centre punch and a pair of mole grips. Once this was off, the wiring loom was removed, and it was time to get the swinging arm out... All of this went smoothly, until the r/h chain adjuster came out in 4 pieces... One of the previous owners obviously knew about this, as they attemped to fix it with a big washer. I think it's safe to say, that for their sake it was a good thing it was nicked before it collapsed in the fast lane of the M25.
And, it will come as no surprise that all the swinging arm and shock linkages have corroded solid, despite Mr. Yamaha's thoughtful provision of a grease nipple.
The front wheel was removed with the aid of the club hammer again, as the spindle had seized itself to the bearings. Once out though, the wheel itself looks fine, even if the bearings are obviously scrap. The spindle will clean up OK, and I'll make up a spacer to replace the now redundant speedo drive. I think I've got some spare wheel bearings of the right size somewhere, so I won't be adding these to the shopping list just yet.
It's safe to say that there are drawbacks to buying a bike off a scrapheap and turning it into a racebike. Things like seized suspension I was expecting, but it's the daft things like the chain adjuster, powervalve linkage and butchered wiring loom that are irritating. That and the fact that I've not yet been able to remove a single screw without resorting to extreme violence. However, it will all be worth it in the end - if nothing else it's a challenge.
14-Aug-2002
Well, not much to report, other than a good clean up of the swinging arm and linkages, and a large bump on the head after walking into the frame which I suspended from the ceiling to get it out of the way. The bottom half of the engine is still at Cambridge Motorcycles awaiting the removal of the stator. The swinging arm bearings and linkages are actually OK - they just needed a good clean up and regreasing.
20-Aug-2002
Got the bottom end back from Cambridge Motorcycles, and set about splitting the crankcases and removing the crank & gearbox. Another one of those little anomalies appeared here... The gearbox (a notorious weakpoint on TZRs) is perfect. There's no wear at all on the selector forks, drum or gear clusters as far as I can make out.
To celebrate I walked into the frame again.
The shopping list so far:
27-Aug-2002
Very little to report really - the engine is now sitting there in lots of little pieces waiting to go to Graham File on Thursday. I've cleaned the crankcases up as much as I can, but there's so much engrained crap on there that it's a bit pointless trying to get it perfect. Let's face it - the bike's never going to be an RC-211V, so there's no point in trying to make it look perfect. Still, the important bits are clean, so I'm happy with that. I also stripped the forks, to see just how bad they really were. As suspected, the fork legs are pitted beyond redemption, and the seals are the worst I've ever seen. One of them looks like it's been lovingly removed, savaged by a small terrier and replaced. Luckily I have a complete set of forks on their way to me, so I'm sure that I can bodge together one decent set out of the two sets.
Cost so far:
Clutch and crank oil seals: �.07
30-Aug-2002
The more I think about it, the more I realise the similarities between Graham File and The Lovely Faye. Similarity number one is that I can cheerfully drive a 300 mile round trip just to go and have a chat with either of them. Luckily, seeing as I married Faye I don't need to do this very often, but yesterday I did make the journey to go and see Graham to see about my engine. Similarity number two is that they both have an uncanny ability to get me to spend money without me realising just how much it's all going to cost. In Faye's case, it's normally either a splendid evening in a posh restaurant or several new pairs of shoes. In Graham's case it was machining the barrels, powervalves, head, crankcases, reed blocks, a complete crank strip and rebuild, and a lot of other Secret Squirrel stuff I can't tell you about.
The third similarity is their legs, but I don't suppose either of them will thank me for saying that.
17-Sep-2002
Well, it's been a couple of weeks, and there hasn't really been a great deal of movement, as Graham still has my engine, and I still don't have a pair of forks to begin work on the chassis. However, I have managed to get hold of 1 complete engine without powervalves, and one complete bottom end as spares for the grand cost of zero. Both of them are in various states of disrepair, with scrapped cranks and other problems, but I should be able to get some decent spares out of them. To this end, I started stripping them last night. Within 5 minutes I'd clouted the carb inlet rubber with the rubber mallet accidentally, the retaining screw shot out, and twatted me neatly between the eyes. However, all the hassle was worth it, as one of the motors has a good clutch basket, which I can use to replace the one I broke a few weeks ago.
I'm sure that this bike now has a vendetta against me. So far the frame has assaulted me three times, and I'm now being attacked by the carb rubbers.
Oh, and it's probably worth mentioning that the only way I could get the piston out of the l/h barrel on the spare engine was with a hacksaw, club hammer, and rubber mallet. Miraculously, I think the barrel is actually salvageable. I'll try and get a picure of the remains of the piston, as it's quite impressive.
Oh, and while I'm here, another big thanks to Cambridge Motorcycles for giving me the spare bottom end, and Nick Reynolds for the spare engine.
20-Sep-2002
I think it's fair to say that sometimes over the past couple of weeks I've wondered why I bothered starting this whole project, when it would have been easier and cheaper just to buy a readily prepared bike and race that instead. However, my enthusiasm has been rekindled...
Firstly, a chat with Graham File about the engine: His words were "I'm going to build you the dogs bollocks of TZR motors". OK, so all thoughts of a budget rebuild have gone out of the window now, but I don't care. Grahams workmanship and attention to detail will ensure that the engine will not only be immense fun to use, but it will also be a work of engineering art. That, in itself, makes it worth building the bike myself.
Secondly, I started stripping the spare engines for spares. I knew that the crank was seized solid on one of them, but this has a positive upshot... When I discovered that the clutch plates had also welded themselves together it made removal of the clutch basket an absolute doddle. This made me a very happy bunny. And when the stator and ignition pickup screws came out without resorting to an oxy-acetylene torch and bloody big hammer I was even happier
Thirdly, I started cleaning up the frame ready to accept the engine when I get it back. It turns out that one of the previous owners had actually polished the frame spars, but they had corroded so badly again that I hadn't noticed. (The standard Yamaha finish is anodised a monumentally ugly dark grey). So, this means I get to spend another six hours or so with a tube of Autosol and a supply of rags to try and get it back to it's shiny loveliness. And oddly enough, I'm looking forward to doing this.
21-Sep-2002
Right then. Time to actually start doing things, rather than just talking about it and getting other people to do the work. First up, the swinging arm and linkages. Remember earlier I said that these appeared OK? I was wrong. Once I took the seals and bushes out, it transpired that the whole lot had rusted solid.
The shopping list so far:
For one moment I though about just bodging it all back together and packing everything with grease to try and get it all moving reasonably freely. Then I thought better of it. There's no point in having a good engine if I can't get the power down 'cos the rear end is bouncing around like Pamela Anderson holding a trifle on a bouncy castle.
I think it's now safe to say that this project is no longer a test to see just how cheaply you can build a race bike for. It's now become a project to see how cheaply you can build a competitive race bike for. All I've got to do now then is find a competitive rider once I've finished it.
23-Sep-2002
Given the state of the rear suspension linkages and fork seals, I thought it prudent to check on the condition of the head bearings before I start putting the chassis back together. The balls themselves were serviceable, but not brilliant. The cups, however, were pitted and rusted as expected. So, another trip to the chaps at Cambridge Motorcycles...
Cost so far:
Taper roller head bearings: �.60
Yup, another 40 quid... And this was the cheap option, as the standard Yamaha nasty balls and cups were even more. At the same time I ordered the necessary bits to rejuvenate the rear suspension linkages. I stopped looking when I noticed the first bearing was �.
If this isn't the finest handling TZR on the grid by the time I've finished I'll be inserting that 27 quid bearing into the nearest passing Yamaha salesman.
24-Sep-2002
In a fit of excitement (actually, it was because there was nothing good on
telly. How comes Scrapheap Challenge isn't being shown any more?) I
decided to fit the new head bearings last night. The old cups came out of
the headstock with only minimal persuasion from the rubber mallet and a
large drift. Insertion of the new bearings was somewhat more problematic
though:
Faye: "Erm, what's all that banging?"
Me: "Oh. Was it a bit loud? I'm just drifting a bearing in."
Faye: "Erm, it was rather. Any idea what the time is?"
Me: "Oh. Is it late?"
Faye: "Well, it is gone 11. And you've still got your best clothes on."
Me: "Um..."
So the evenings mechanical shenanigans stopped there. Fair point. I was
making a bit of a racket, and my neighbour is currently about 39 weeks
pregnant so probably wouldn't have thanked me if I'd woken her.
Although I do find it odd that Faye can sleep through an earthquake (literally. We had an earthquake of 4.8 Richter a couple of nights ago) yet drifting in a bearing is an altogether louder event. I reckon it's something genetic.
30-Sep-2002
Well, things are now starting to progress apace on the chassis front. My miraculous blagging powers have now resulted in a complete set of forks and bodywork sitting in the garage - ta Andy. These forks will be stripped, and I'll cobble together a pair from the best parts of both sets. The bodywork is also in pretty good nick, just needs a bit of tidying up. However, this is the last thing that I need to worry about at the moment, so I'll probably just lob it up in the loft for the time being. I also finally got around to fitting the new head bearings, and it has to be said, they're *sooo* much nicer than the old ones.
You know, I'm begining to think that this bike may turn out to be quite rideable when I've finished it. And I'm jolly well looking forward to riding it. I suppose at some point I'd also better start thinking about colour shemes. I may end up with a replica of my 2000 series paint scheme, like this 'cos I always quite liked that one.
01-Oct-2002
Paid for the rear suspension bearings and bushes...
Cost so far:
Rear suspension overhaul: �.98
10-Oct-2002
Well, we have some exciting developments... Firstly, the bike is now suspended on completely rebuilt and refurbished linkages and forks. And yes, I am rather pleased with the results. Everything moves smoothly, and there even appears to be a modicum of damping, at least from the front end. The old bearings had seized so badly into the rear suspension linkage that they had to be burned out with an oxy-acetylene torch before the new ones could be fitted.
Secondly, I've finally sorted out my PC to a point where I can use a scanner and my digital camera again, so there's going to be some photos uploaded here soon. Shame I couldn't do a 'before and after' kind of thing, but that's just the way it goes.
Cost so far:
Workshop time to get the old bearings out: �
(Yes, I said that I'd be doing all the work myself where possible, but I don't have an oxy-acetylene torch to get the old bearings out. On speaking to Spike it took him over two hours, so I reckon that 25 quid is a good price).
13-Oct-2002
Time to start putting things back together again I suppose... So, first thing to attack was the clocks. The removal of the speedo was a rather simple affair. Or rather, it would have been if I didn't have to remove all the wiring etc. etc. from the tacho and temperature gauge to get to it. Anyhow, a rather brutal attack with the wire cutters soon solved that particular problem... So, with the clocks out of the way, the housing could be chopped down to size, and the remaining wires routed properly. Flushed with success I tried to mount the newly foreshortened clocks back onto the bike before noticing that I'd lost a couple of small rubber bushes. (We can't grow rubber trees out here in the fens, so we have to make do with bushes). This problem was soon solved with an old ZXR750 master cylinder I had kicking around in the shed.
|
|
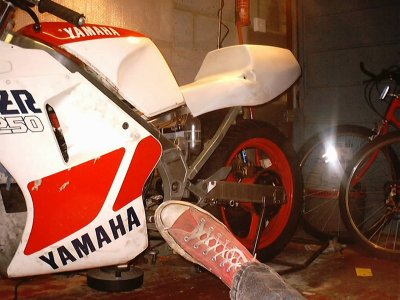
Oh, and just to prove that my digital camera works, here's a picture of the bike before I put the clocks back on. The strange glow in the background is an alien spaceship landing. They soon realised that the most intelligent thing in the fens was a small turnip, so they buggered off again. |
|
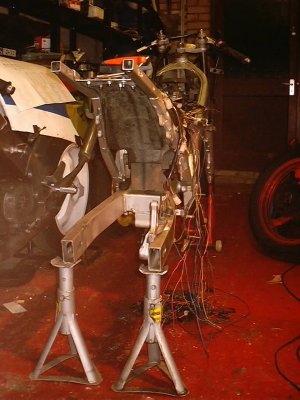
At this point it kind of made sense to carry on with the wiring, and the first thing to do was remount the CDI unit and YPVS control box. The standard fitment leaves them dangerously exposed, and the first accident normally wipes at least one of them out completely. So, a quick bit of drilling, and we get a rather nice place to mount them under the seat hump. I'll probably stuff the units in a plastic bag to keep out water at some point as well. Once this was done, my attention turned to the wiring loom. I had two choices. Firstly to hack and butcher the existing loom to fit, secondly to sell the road loom, and make up a race loom. This decision was spectacularly easy to make, as the existing loom had already been butchered by a previous owner, so I could never have sold it anyway. So, out came the wire cutters again... There's still a load of work to be done on the loom, but the final configuration depends on whether I leave a charging circuit in there or not. Decisions decisions... Notice the tasty TZ250 in the background. This is for sale in case anyone wants a lovely GP bike to grace their garage. |
|
|
|
And finally for now, here's a gratuitous photo of all the bits I've removed so far. Anyone want them? Mail me if so, and the first person to come up with a decent bribe gets the lot. |
16-Oct-2002
|
|
Well, work continued apace on the wiring loom last night, and right at the moment, I'm not sure that the thing will ever work again... The loom has shrunk from about 35 wires in the central bundle to about 6, and I'm sure I've chopped out something vital. Time will tell... At the moment I don't have a battery to test anything with, so there's no point in worrying about things unduly. I've also rewired the ignition and p/valve circuits to go through the r/hand switchgear, and junked the ignition barrel. This saves about a kilo in weight, just by removing this. So, I now have the kill switch controlling the ignition, and the old lightswitch controlling the p/valve circuit. Very neat. Very tidy. It'll probably never work though. I thought about really going to town, and fitting a two-gang switch to control both functions, but seeing as I need the switchgear on there anyway as it houses the throttle assembly, I rejected that idea as needless complication. It might resurface at some point though. |
|
I also resprayed the facia plate of the instrument binnacle. It was getting pretty tatty, and seeing as I had an old can of black paint kicking around it seemed apt. I didn't bother cleaning off the old paint, or even washing the grease off the plate, so I'm fully expecting the new paint to peel off within 5 minutes of re-assembly. |
|
More bits taken off...
18-Oct-2002
|
|
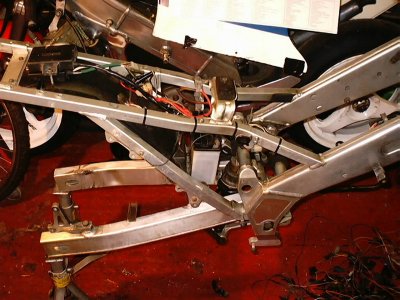
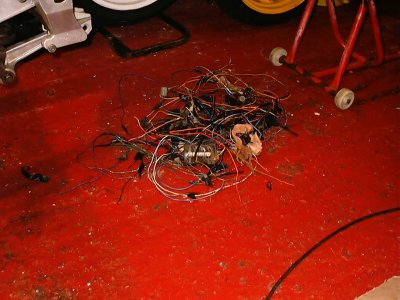
Somewhat miraculously, the wiring work is now finished, with no major cock-ups. And, if I say so myself, the finished result (left) looks fairly tidy. I've still got a little bit of tidying to do on the front, specifically replacing the 12 kilogram Yamaha connector with something a little more practical. On the right here is the amount of wires I've taken out of the loom... |
|
22-Oct-2002
Well, things are progressing apace on the engine front as well as the chassis at the moment. I spoke to Graham this morning, and he's confirmed that things are just about done, and we can begin the final assembly. So, another shopping list is created to enable this to take place:
The shopping list so far:
And that, hopefully, is that for the motor. There are still things to buy before the bike hits the track (notably tyres, chain & sprockets) but that's really about it. I managed to scrounge a brand new battery in the week in return for helping my mate Sol rewire his project RS500 bike so that's saved another few quid. And, on top of everything else, I got hold of the steel to make a paddock stand rather than going out and buying one. I suppose I should add that to the cost...
Cost so far:
Components for paddock stand: �
23-Oct-2002
Excellent - after one day the necessary engine bits have turned up, and for once, I'm pleasantly surprised how cheap they were.
Cost so far:
Clutch cover gasket, powervalve linkage, gearbox oil seal circlip,
gear change shaft oil seal, reeds, reed block gaskets, metal polish: �
24-Oct-2002
Ring ring...ring ring...ring ring...
"Hello?"
"Hi Neil, it's Graham. Bad news. Those powervalves?"
"Oh. Are they bad?"
"Worse than that..."
"Oh. Erm, how much are new ones?"
"You don't want to know. Can you get hold of any s/hand?"
"Dunno. I'll have a go and see what I can turn up."
I'd been dreading this conversation, as I know how difficult is it to get s/hand powervalves at the best of times, let alone at short notice. However, the chaps down at Cambridge Motorcycles had just taken in a complete TZR250 motor. Would they be willing to sell me just the powervalves? Probably not, as they would rather sell the whole motor. Something they had tried to do to me yesterday...
So, at 5 minutes notice I drove down to Cambridge Motorcycles...
"Phil, that TZR250 motor..."
"Oh yup. Do you want to buy it?"
"Um. Not really. Would you sell me just the powervalves? I mean, I'll probably
end up buying the rest of the top end anyway at some point in the season."
"No worries. When do you need them by?"
"Erm, that's the other thing... I'd like to get them down to Graham today
if possible"
"Yup - you can use my toolkit. The motors out the back. Take what you need
off it, and call it forty quid."
So, within the hour I had the top end stripped, the powervalves out, and the motor back together again. Job's a good'un.
Cost so far:
Powervalves: �
25-Oct-2002
Well, seeing as the motor is now, to all intents and purposes done, the chassis is just about done, the electrics are done, what does that leave us? Well, there's the bodywork for a start. I hate doing the fibreglass stuff 'cos it makes my hands itch, and as far as painting goes I'm not reknowned for my artistic abilities. So, that goes right to the bottom of the list... I've got to sort out some tyres at some point, but they'll need to wait until I get some money from somewhere. Ditto for the chain and sprockets. Which brings us nicely to the brakes.
Given the state of the rest of the bike, I was fully expecting to have to scrap the pistons in the caliper and either machine some up from billet or see if I could get a good deal on some new ones. However, upon splitting the caliper last night it became obvious that while they were grubby, three out of the four were in good condition. The fourth looked like it had been savaged by a small alligator at some point, but looked salvageable. So I popped the pistons out using a compressor, remembering this time not to point it at my head. Last time I did that I was walking around with a very bruised nose for several days. The seals were still in perfect condition, as were the dust seals. In fact, apart from the caliper boby being dirty, everything else is in remarkably good shape. Looks like someone in the past had the sense to have the brakes cleaned at reasonably regular intervals. I cleaned up the damaged piston with an oilstone and some autosol, and that was that really. Just need to clean up the caliper, and reassemble it all.
Cost so far:
Brake Cleaner: �
Autosol: �
29-Oct-2002
I've been doing some thinking about exhaust pipes... Now, while it's true to say that this is a budget project so I'll be sticking with the standard pipes to begin with, I have to realise that at some point I'll stick it backwards into a gravel trap, and I don't have any spare pipes. That, coupled with the fact that the standard pipes weigh about 95 kilos each means that at some point I'll be looking for some aftermarket ones. Research has so far dug up the following information:
So, anyone out there got any bright ideas? Specifically, does anyone out there have a pair of any of the above aftermarket pipes that I could borrow to put on the dyno? Or, being cheeky, if any of the manufacturers would like to run a pair of their pipes on what is now the most famous racing TZR in the country, please mail me. (This is true. Despite never having turned a wheel I'm getting a lot of interest in this project from a lot of people. I've even been called an expert).
04-Nov-2002
Well, the brakes all went back together nicely, feel as good as new. In fact, they feel a whole lot better than new. This is a Good Thing, as TZRs rely on the single front disk for those first lap comedy outbraking moves. While fitting the rear brake lever I also took the opportunity to cut it down to a size that's more in keeping with it's application. The standard rear brake pedal is capable of stopping a Scania.
And so, to the wheel bearings. I was going to buy new ones anyway, as they are reasonably cheap, and given the state of the rest of the bearings on the bike it just seemed prudent. I was therefore relieved to find out that the current bearings (in the rear at least) have long since given up any pretence of rotating freely, so it's money well spent. Well, it will be when I actually spend it.
More bits taken off...
All is not sweetness and light though... Graham called to mention that the
carb rubbers had perished with age to a large degree. (Not surprising when
you consider it's sat in a field for a month). So, a quick trip down to
my mates at Cambridge Motorcycles revealed the awful truth. Yamahahaha want
50 quid for them. Each... By the time I'd stopped laughing, I had a quick
look at the motor I stripped the powervalves out of last week, and lo and
behold, a pair of reasonably serviceable carb rubbers were found.
"See? Told you I'd end up buying the whole bloody thing as I went along" I
said to Phil, as he cheerfully took my last tenner out of my wallet.
Cost so far:
Carb rubbers: �
Actually, it's probably about time I had a quick tot up of the running total:
Running total: �4.65
That's without new tyres, the engine rebuild, and chain & sprockets. But, I
don't think that's too bad. I've brought the bike, completely rebuilt the
chassis, paid for a large portion of the necessary engine components and
saved a lot of money by doing things like the wiring and suspension
servicing myself. Where I could buy s/hand parts (powervalves, carb rubbers)
I've done so, but I've also got a whole load of new parts where they were
absolutely necessary (head bearings, crank seals etc.) I've also managed to
blag a clutch, fairing, pair of fork legs, battery and two spare engines
so far, so I can't be too unhappy with the costs :o)
05-Nov-2002
My first extravagant expenditure... I found a pair of pipes in a breakers yard for 30 quid, so snapped them up before anyone else did. No idea what condition they're in, but the chappie on the phone said they were in good condition other than a weld on the r/hand pipe. I guess I'll find out in a couple of days time.
Cost so far:
Spare pipes: � (Bargain of the year if they're any good).
Wheel bearings: �
07-Nov-2002
Well, at least one decision that I was pondering over has been made for me... I couldn't work out whether to use a total loss system, or to keep the charging circuit. However, a quick call from Graham soon convinced me to remove the charging circuit on the grounds that it saps power, and anything that's not there can't fail and let me down. Just need to add another battery (or two) to the shopping list now, as I'll need to have at least two fully charged batteries around just in case.
11-Nov-2002
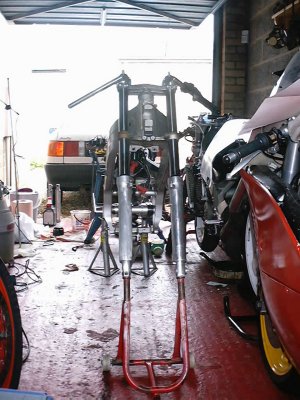
Well, the engine is now safely installed in the chassis after a long days
driving to and from Hythe yesterday. And it is, of course completely
gorgeous. Clean enough to eat my dinner off. (In fact, it's quite a bit
cleaner than most of the plates in my house). The original plan of just
getting the barrels and head worked on went out the window a long time
ago, as Graham just doesn't do that kind of work. He builds a motor from
the ground up, and optimises every part to work with every other part.
So, from the bottom up we have:
And so, to the bill... I'm not going to count the costs of labour, 'cos my wife might read this. Besides, it'll be different for every engine and every tuner, so there's not much point in listing it here.
Cost so far:
Everything in the motor that moves: �0
I reckon that's a bit of a bargain actually. I mean, I've now got a new crank, rods, pistons, rings, seals, bearings, everything basically. The big ends have been uprated with something more useful for the stresses of racing. The crank has been perfectly balanced, and the new rods matched to the pistons and barrels to ensure perfect squish. The clutch springs have been replaced with proper Yamahaha racing items, and I've even got another couple of pairs of plugs thrown in, one for running in and one for racing in cooler weather.
12-Nov-2002
Finally got round to weighing all the stuff removed so far... Would you believe I've shed 13 kilos so far? There's more weight to be lost too, with a bit of imaginative hacking/butchery of the fairing mounts and a few other bits and bobs.
The engine is now sitting happily in the chassis, and has had all of the necessary bits connected to it. I have to say though, I'd completely forgotten how cluttered these things are to work on, after three years of the TZ. At the last minute I remembered I still need new throttle, clutch and powervalve cables, so I'll be popping along to Cambridge Motorcycles at lunchtime to give them yet more money. I have a bad feeling that TZR clutch cables are ferociously expensive for some reason.
13-Nov-2002
Seeing as my credit card company recently upped my limit with no good reason whatsoever, I thought I may as well make use of it... So, added to the shopping list are:
The shopping list so far:
And we have another comedy spares price to report... That throttle cable? 35 quid. Yup, 35 quid for a bit of cable. There was no price available for the clutch cable, but seeing as I'd just been quoted � for the fuel coupling I didn't care by that point.
Excellent - another three figure credit card bill in the name of budget racing. The 15 tooth front sprocket is on the assumption that we'll be racing at Snetterton next year, as that's really the only circuit where it's necessary. I didn't bother with a 43T rear, as it would probably only get used at Cadwell, and they're 20 quid each. The fuel hose and stuff are essential on the grounds that if I can't get any petrol to the engine it's really not going to work all that well. The standard fuel tap is old and knackered, and would cost more to replace than the far more useful and elegant solution of the fuel coupling.
18-Nov-2002
Well, the total bill for the pot of spares above came to exactly �5. I'm going to have to start selling my body I think to pay for this lot.
Cost so far:
Cables, fuel system, chain & sprockets: �5
But, I'm now confident that that's it as far as expense goes other than the tyres. The bodywork will be bodged back together with glass fibre and duct tape. My original plans for a posh paint job have gone out of the window on the grounds that it's fifty quid that I just can't justify any more. I still have some paint left over from my TZ tricolore paint job so the TZR may well get the same treatment. It does need a new screen, but I'll try and dig something up from a breakers yard somehere rather than paying full retail.
One thing is worrying me slightly at the moment though... After I'd fitted all the bits and pieces over the weekend I decided to see if I could get a spark out of the motor. Sadly, there was not an electrical sausage. I'll have a good look at it at some point in the week, 'cos I've got to get a new battery for my multimeter. Or blag an oscilloscope from somewhere.
And, in another display of my woeful ineptitude, I remembered that a 43T rear sprocket is actually a very handy thing to have, and that I already have a 41T sprocket on the bike anyway. It's not so bad though, 'cos the ally sprockets I ordered are a whole lot lighter than the stock steel one, so it's a Good Thing to have anyway.
28-Nov-2002
Been fairly quiet for the past few days as I'm still recovering from the last credit card bill. Anyway, I've taken some more photos of things that I'll upload when I get my USB port working again (another victim of Windoze driver failure). And, seeing as I've now got all the parts needed to finish things to the point of getting it running and on a dyno, it's probably about time I started bolting them together.
So, the fairing to start with... Of course, the side panel fixings are broken, the TZ pattern seat unit doesn't fit, and the cowling needs a fair bit of glass fibre to fix the hand blisters and fill in the headlight aperture.
So, moving swiftly on, I decided to try and get the engine running. The new fuel filter and coupler was fitted without too much grief, and the carbs were checked, cleaned again, and the main jets replaced to suit the now modified airbox. Everything was looking good... Then I remembered that last time I tried to get a spark I didn't get anywhere, and my multimeter still has a flat battery. OK, so not a complete success there. Still, I decided to clean up and re-fit the exhausts in readiness...
I thought the best thing to do would be to clean out the pipes before refitting them with the infamous caustic soda solution. So, I removed the baffles from the end cans, and suspended the pipes with the open cans pointing upwards. The other end of the pipes were covered with rubber gloves that were cable tied in place, and I tipped a couple of litres of hot caustic soda into each pipe.
Of course, it goes without saying that there are more leaks than the front row of a Max Boyce show. So, I either need to get the pipes patched up, or get a new pair. Although I've still got the s/hand pair kicking around somewhere. I'm not sure who has them at the moment.
So, in a nutshell, I have a fuel system that looks capable of storing fuel, and flowing it to the engine. Sadly once it get's there there's no way of igniting it, but that's pretty academic anyway, as there's no way of extracting the spent gases from the combustion chamber either. Add to that the fact that the bodywork doesn't fit, and even when it does it will need repainting and you'll begin to see that my enthusiasm is at a bit of a low point at the moment. However, all is not doom and gloom... While I've been sitting around waiting for the bike to fix itself in the corner I've resurrected the (in)famous TZR Tour for next year. So, as well as racing in the BMCRC Yamaha Past Masters class I'll also be racing in my own championship. Seeing as I'm the series organiser I'm virtually guaranteed of a trophy at the end of the year :o)
01-Dec-2002
Well, after a fairly busy weekend in the garage, I find that I nearly have a complete bike... OK, so I've not actually run the engine yet, but that's a minor detail. The major event of the weekend was the fitting of the bodywork, with the able assistance of my mate Sol, he of the project 'prilly RS 500. First thing to tackle was the seat unit. I'd kept one of my spare TZ seat units for exactly this purpose, but it was rather tatty. Anyway, we measured it all up, decided where we needed to cut it, and started hacking away. What seemed like 30 minutes later I was still cutting at it with the hacksaw, and not really getting very far. Closer inspection revealed that this was, in fact, a complete carbon fibre seat unit... Is this going to be the only TZR in the world with a carbon seat unit? Quite possibly. The worst thing is that I probably could have renovated the unit and flogged it to a TZ racer for a good couple of hundred quid, and brought a complete set of TZR race plastic and a couple of good curries with the proceeds. Still, there's no point worrying about that now. I need to fabricate a small supporting bracket for the rear of the unit, but that will have to wait until I can get some ally from my local metals warehouse, as I used the last of mine fixing the fence after the gales a few weeks back.
Anyway, flushed with success at getting the seat unit to fit I then started on the left and right fairing panels. The incredibly useful little hinge affair at the bottom of the panel had seized solid and snapped of at some point, so I drilled the old pins out, and bodged some new ones in using Araldite and the trusty rubber mallet. It's not a perfect fit, but it's good enough for me. Come race time I'll put an extra couple of holes in there so I can cable tie the two panels together as well as bolt them on - I've had a couple of TZR fairings fly off at hight speed before now, and I'd rather not make a habit of it if I can help it.
And so to the top cowling - well, it fits without any modification, and looks like it just needs to have the headlight aperture filled with glass fibre. Oh, and the hand blisters need renovating, and I need to fit some Dzus fasteners to hold the whole lot together. And that's about it for the bodywork. Once this little lot is complete, all that needs to be done is the painting, and I can forget about possibly my least favourite bit of bike building.
|
|
This was meant to be a photo showing off the lovely carbon seat unit. Instead it's a photo of yours truly falling over backwards whilst attempting to balance on a small can of avgas. Yes, my feet really are that big... |
So what else is remaining? Here's what I can think of right now:
Cost so far:
Air filter, exhaust gaskets x4, head gasket, base gasket x2, reed valves
x4, gudgeon pins x2, crank seals x2, gearbox oil seal, oil pump gasket,
fork seals: � (thank you eBay).
05-Dec-2002
It lives!!! After a fruitful couple of hours in the garage this evening, Project Fast Hamster has emitted it's first squeak!
And unlike the rest of the project so far, it was a remarkably painless process. The pipes were fitted with reasonable ease - I just needed to re-tap the threads where the previous butcher had tried to mount them with some ancient Whitworth threaded bolt. Oh, and I needed to enlist the trusty rubber mallet one more time to get things lined up correctly. (OK, so this sounds like a bit of a carry-on, but compared to the rest of the project so far, this was a very minor niggle). I drained the year old petrol from the tank, and lobbed a splash of pre-mix avgas in there as I didn't have any super unleaded to hand. I then fitted the radiator, and raided the condensor in the tumble dryer to get some soft water to fill it with. (Out here on the edge of the fens the tap water is so hard it comes out of the tap in chunks).
And, with remarkably little drama, it fired up on the third kick. OK, so it's only running on one cylinder at the moment, but that's a trivial detail probably caused by my wiring expertise... The tacho even worked.
I am an immensely happy bunny right now. Things were looking pretty bleak yesterday after one of those conversations with my bank manager - I actually thought I may have to sell the bike without it ever turning a wheel under me. However, the bank have agreed to extend the overdraft again, so I can afford to carry on for the time being. Potential sponsors out there can always mail me if they want to donate cash in return for favourable mentions on these pages and get their logo displayed prominently in next years crash video.
Oh, and please, somebody buy my TZ250.
11-Dec-2002
A bit of a delay to the updates here, 'cos I've had a nasty bout of tonsilitis over the past few days, so have been safely tucked up in bed with me hot water bottle.
Anyway, back to the motor - last time I mentioned that it fired up, but was only running on one cylinder. My first thought was that it was something electrical causing the problem, but closer examination revealed that the coil only has one input for the two pots, so it couldn't be that. So, it had to be fuel. A quick strip down of the carbs revealed one full float bowl, and the other bone dry. So, I cleaned everything up, checked the floats and fuel hoses, and put it all back together again.
With fingers crossed, I opened the drain screw on the bottom of each float bowl. Dammit and blast, there was still one empty float bowl, on the right carb. Perplexing to say the least. However, I then noticed that the fuel hose was a bit long, and had a slight kink in it. I re-routed the hose, and fitted the tank back on. As I did so, I heard a nice 'glug glug' noise as the right float bowl filled up.
It started first kick, and after about 15 secs I knocked the choke off and it sat there ticking away perfectly. I let it run for a few minutes to get some heat into the motor and check the operation of the temperature gauge. No problems there either.
So that's that as far as the engine goes really. I was thinking of buying some new choke cables to replace the slightly sticky ones that I've got, but as this is still being done to a budget I've simply cleaned up and lubricated the ones that I have. Once I get the seat unit fitted correctly I'll be booking some time on my local dyno to get the motor run in, and some preliminary power figures. On second thoughts, I might not bother with the power readings. The acid test comes when I race it, not on the dyno. I've seen too many racers get hung up on chasing peak power figures. I'd rather have a useable engine that suits the way I ride - that's what I asked Graham to build me, and that's something that a dyno isn't too good at measuring.
19-Dec-2002
I decided that last night was as good a time as any to try and fabricate the necessary bracket to support the seat unit. So, armed with a nice piece of aluminium, a hacksaw, selection of files, blowtorch and steel ruler I measured things up, and started cutting. I was determined to get this right, as I've seen no end of very nice looking race bikes spoiled by bodged on fairings held together with bits of Meccano and ancient plumbing fixings. So, following the old adage of 'measure twice, cut once' I measured things up carefully, marked it all out, and started cutting. This stage of proceedings went remarkably well, and within about an hour or so I had a nice sheet of ally, cut to the right size and shape, and with all the edges nicely smoothed and filed.
Bending it to shape was slightly less successful. However, I persevered, and after a fair bit of heating, bending, heating again, hitting with large mallets, swearing, heating, bending again, and finally standing on, I ended up with something that looked the way I'd planned it to.
It was at this point that I realised that a complete redesign was in order, as I'd built something that was capable of supporting the Forth Bridge, rather than a lightweight bracket for a racebike. This was largely academic anyway, as it didn't actually fit.
Another victory for my amazing engineering and mechanical aptitude. It can only be a matter of time before I get the call from HRC to replace Jerry Burgess as crew chief for Valentino Rossi. I'm undecided what to do at the moment. I could go out and buy some more ally and have another go. Or I could just bodge something with a few old bits of Meccano and some ancient plumbing fixings...
13-Jan-2003
Well, over the past couple of weeks I've been doing a lot of looking at the fairing bracket debacle, sucking my teeth, and pondering lots. Eventually I decided the best thing to do was get some new ally stock, and an ally welding kit. I now have both of these in the garage, so I just have to wait for the temperature to rise above freezing before I venture out there with the blowtorch and try and fabricate something.
Cost so far:
Ally stock: �50
Tecno-Weld kit: �
This seems a bit of an extravagence, but apparently I can use it for fixing footpegs and all sorts of other ally jobs, so hopefully it will pay for itself.
14-Jan-2003
In a departure from the normal engineering ineptitude that I've displayed so far with this project, it would appear that I now have a rather nice bracket for the seat unit. Sadly I can't take any piccies, 'cos I left my camera up at BDK Race Engineering a few weeks back. Suffice to say though that the ally welding kit worked nicely (even if my weedy little blowtorch was barely up to the job) and the new bracket fits perfectly. All in all, I'm rather pleased with myself.
04-Feb-2003
Blimey, it's been a while... Basically, it's just been too cold out in the garage to spend any real time out there, so for the past couple of weeks I've just been tinkering. The seat unit is now fitted, and just needs tarting up. The top cowling has been prepared (or, for want of a more thorough description, attacked with a jigsaw) and just needs a bit of glassfibre in the headlight aperture and tidying up. The side panels will probably need a bit of work too, but I've not really looked at them yet.
11-Feb-2003
Tyres. Bearing in mind that they are one of the simplest parts of the bike, and all I need to do is pay for them and fit them, you'd expect this section of this project to entail very little in the way of grief and indecision. Nothing, however, could be further from the truth. Back in the good old days of TZR racing, the only real option was the Avon AM22/23 'club' compound fitment. (As opposed to the 'track' compound, which was actually a road tyre. Don't you love it when marketing gets in the way of common sense?) Anyway, I digress. This is still a very good fitment, but the front is a bit heavy, and they're expensive, coming in at around �0 a set.
And so, to plan B. Bridgestone BT39SS. They're the right size, the right compound, and, more importantly, cheap, at around �0 a pair. Well, that was easy, wasn't it? I'd best order some. Oh. They don't make them any more, and there are no stocks of the correct size anywhere.
OK then, plan C. Dunlop GPR70. Cheap as the proverbial chips, grippy, and they do a nice 110/70 front fitment. Only the smallest rear they do is a 140, and the largest tyre you can cram onto a TZR wheel is a 130 (and even then it's oversized). Same story with Bridgestone BT090. And Pirelli Super Corsa. And every other sports tyre I can find.
Which leads us to Dunlop KR364s - a 125GP sized intermediate. Yup, they are a suitable width, but such a low profile that ground clearance becomes an issue unless you fit a neater set of pipes. (Or modify the tie-rods, maybe more of which later...)
Basically, I'm undecided in a big way. I reckon I'll end up with a GPR70 front and AM23 rear, very similar to the combination of BT96F and AM23 on which I broke my wrist a couple of years back.
12-Feb-2003
Wa-hey!! The tyre hunt has borne fruit (well, not actually fruit, but you get the picture) at last. The splendid Sterling Motorcycles have a pair of BT39SSs, delivered, for �3. Dunno how good they'll be, but at that price, I'm willing to take a chance. And, because I'm nice, I'll give them a free plug. Sterling Motorcycles on 0800 328 0812. Nice people to buy stuff from. Oh, they also have a web site as well.
Cost so far:
Tyres: �3
13-Feb-2003
Well, sad as I am to say it, that's really about it as far as phase one of Project Fast Hamster goes. Just a bit of tidying up of the bodywork, and a bit of setting up, and it's ready to race. The tyres turned up this morning (with a note informing me of an as yet unquantified 'carriage charge' that I wasn't told about when I ordered them) so just need fitting.
So, much as I hate to do this, let's have a grand total:
Grand Total: �83.15
I reckon that's not a bad deal at all. It's less than I paid for my first race TZR, and it's got new tyres, new bearings all round and a new motor. OK, so there's been a lot of blagging along the way (which reminds me, I also have a spare pair of wheels courtesy of Roger Ford) but I think that's par for the course when you are restoring an old bike
So that's end of part one then. As always, loads of people to thank, particularly Andy O'Dell for the bike, forks, fairing and other bits & bobs. And, of course, The Lovely Faye for not minding too much when I vanished out to the garage for hours at a stretch. And, finally, I'd also like to thank everyone who e-mailed me with encouragement, support, questions, and even offers of beer. The rest of this seasons activities will be detailed in the race diary, but I've got a hankering for another project now. And I did see some TZ750 parts going cheaply on eBay the other day. Hmmm...
28-Feb-2003
Well, despite me saying that things were finished, they're not quite... I spent a very productive day on the dyno yesterday with fellow TZR racers Andy O'Dell and Andy Bryant. The numbers show that my TZR has the lowest peak power at 48bhp, but has the biggest, fattest midrange that I've ever seen on a TZR. Which is exactly what I wanted. Praise be to Graham File for this.
We also got the chance to play with a pair of Swarbrick pipes, and run them back to back with the standard ones. And it's an interesting story... They make a little more peak power (about 1bhp up), but do so at 12000rpm rather than 10000rpm. However, they hold 45bhp and above from 9500 all the way to 12000, as opposed to the stock pipes, that only hold onto their power until 10000. Added to the fact they're about 10kgs lighter, they are definitely better pipes for racing. But, and it's a Big But... I don't want to rev my TZR to 12000rpm, as it won't do wonders for the engine internals, and I'll be looking at changing the pistons and rings a lot more often. Seeing as this project is about fun rather than weekends in the garage with circlips pinging into dusty corners I can't justify a pair.
And, while I'm wittering on about things, I also did some experimentation with the airbox. Now, should I make the results public? Hmmm... I'll have a think about that one. After all, I've got to keep some secrets.
17-Mar-2003
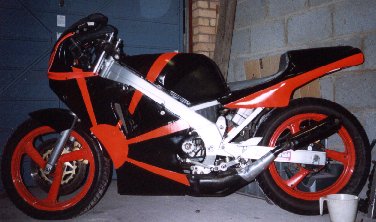
OK, now I can truthfully say that things are finished for this phase of the project. I have just finished painting the bike. Now, as alluded to earlier, I am crap and painting, and slightly worse at design. The original plan was to do 'something black and orange'. So, I dutifully went out and brought a litre of EP21 primer, a litre of black paint, half a litre of orange, and 5 litres of thinners. I don't want to tell you how much this cost. Let's just say that there were no prices on display in the shop I brought them from, and I probably won't be rushing back there again... Anyway, the first thing to get the treatment was the mudguard. Those of you familiar with my race diary will remember that I did this first on my old TZ250, on the grounds that it's small, and easy to paint again when it all goes horribly wrong. I was determined not to worry about the finish too much, so I just rubbed it down with wet & dry, and lobbed 4 coats of primer on there in quick succession, and left it to dry overnight. The next day I threw 3 coats of orange on there, equally haphazardly. Somewhat surprisingly, it all looked very promising.
I then spent the next three days hacking up lumps of orange phlegm and trying to wash the orangs streaks out of my hair. The former was caused by a very cheap & nasty face mask. The latter was caused by me being a total twat when trying to clean the gun.
So, armed with a very posh new face mask (I figure the 15 quid is worth spending given the state of my lungs after doing something as small as a mudguard. Yes, I am normally a cheapskate. However, I don't want to contract pleurosy or any similarly nasty diseases just to save myself the price of a curry) I decided to paint the rest of the bike. Sadly I've been in a bit of a dark mood for the past few days, so everytime I painted anything it came out black.
It's not so much the Fast Hamster anymore, as a cross between Street Hawk, the Bat Bike and an entry for Scrapheap Challenge. I took some photo's, but will have to wait to get them developed and scanned before I can update this page, 'cos I still don't have my digital camera back.
And that, really is that. The only thing left to do is race it. Further updates to Project Fast Hamster will take the form of development, rather than construction. So part I ends here. Part II will, I suspect, begin with some airbox mods and a few dyno runs.
Development will now be chronicled here, as this page is getting rather large now.
PS. I've got loads of paint & primer left over if anyone wants anything painting black and/or orange.
Postscript
Some people have asked for a photo, so here goes:
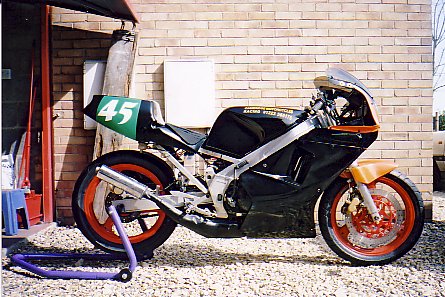
Before the gravel trap... It actually looks quite nice.
Note the Lemming lurking in the background.
![]()
